Wednesday, December 23, 2009

Mutton Curry with Coconut Gravy

DSC04798 Christmas is here and it brings all the memories of childhood, where we enjoyed carols, home decorations, Christmas tree, greeting cards, new clothes, Church worship, family reunions, friends visiting, baking cakes, or making pastries, sweets and savories, purchasing cartons of fruits, distributing goodies to neighbours, friend, relations, etc.. and not to mention the scrumptious feast on the big day..The usual menu in our joint family was Pilaf or biriyani, variety of chicken curries and variety of veggie curries. In my Aunt's place it was always Pilaf/Biriyani with Spicy Mutton gravy and brinjal chutney. No doubt Mutton is the most favourite meat for most Non-Vegetarians back home.

DSC04800 Here is one version of the most loved mutton curry.

DSC04797 Ingredients :
2 lb Mutton cut into bite size
2 Tbsp Oil
3 - 4 Onions over medium size)
4 -5 Green chillies slit
2 Tbsp - Ginger garlic paste
2 Tomatoes (large) or 1 cup Tomato puree
2 tsp Red chilly powder - 2 ½ tsp.
1/4 tsp Turmeric powder
1 Tbsp five spice garam masala power
2 Tbsp poppy seeds (soaked in enough water and ground into a smooth paste)
1/2 cup Coconut paste/puree (add little water to the grated coconut and make a puree)
Salt to taste
Coriander leaves (finely chopped)

For the Five Spice powder :
Put together a handful (around 50 gms)of the following spices and grind into a coarse powder and store in a air tight container.
Fennel seeds
Cardamon
Cinnamon
Cloves
Star Anise
DSC04801 Method:
In a pressure cooker, allow oil to become hot and add onions, green chillies and saute' till onions are fully cooked and mushy.
Add ginger garlic paste and saute till the raw smell is gone.
Add the mutton pieces along with turmeric, chilly powder, and salt and mix thoroughly till all the mutton pieces are well coated.
Add half of the garam masala powder and mix again.
Add cut tomatoes or puree and close the cooker lid for 2 mints without the whistle inserted.
This will create pressure inside to inject the mutton pieces with masala and also in the process the water from the mutton gets released.
Remove lid and add cup of water or a little more, mix and again close the lid, this time with the whistle and cook for 25 -30 minutes on a medium low heat.
After the time is done, release pressure, remove lid and check to see if mutton is almost done.
Now add the poppy seed paste, coconut paste and remaining garam masala and cook for 5 to 10 minutes or until the mutton is soft.
Add coriander leaves and remove form heat.
Serve hot with any seasoned rice, or roti.

DSC04816

Sending this Mutton curry dish to EFM-Mutton Seriesevent hosted by Srilekha of Srishkitchen.

Merry Christmas and Happy New Year to all my viewers, readers, friends and family!!!!!

Monday, December 14, 2009

Ghee Coconut Rice

DSC04819 As we experienced a long-overdue dose of winter-like weather with blowing snow, ice, rain, pellets, heavy snowfall, whiteouts - you name it - we've had a bit of everything. The wintery weather calls for some variety rice instead of a bland version to put some flavour and spice into the dull and dark days of freezing rain with light snow.

Ghee Rice is famous in south India mostly in Tamil Nadu, Karnataka states and northern parts of AP. A typical ghee rice is made with jeeraga samba rice(jeera rice) which has a unique flavour by itself which gets enhanced by addition of ghee and other ingredients..

In Tamil Nadu, they mix both ghee and coconut and make an extremely flavourful rice called Coconut Rice which is truly magical..Mostly basmati rice is used here. Very simple to make, yet packed with richness this Coconut Ghee rice is a great combo with any Vegetarian or Non Vegetarian curried gravies.

Hot Ghee is tempered with cashew nuts, curry leaves, thinly sliced green chillies, onions and grated coconut. To this cooked basmati rice is added and seasoned with salt. Perfect to enjoy with a creamy veggie, chicken or mutton gravy.

DSC04818 Ingredients:
4 cups cooked Basmati rice(add a little salt while cooking the rice)
3 Tbsp Ghee
1/2 cup crated coconut
1/4 Cashews and raisins
2 sprigs Curry leaves
1 large onions thinly sliced
3-4 green chillies slit into four and seeds removed
Salt to taste
Finely chopped coriander leaves if desired.

Method:
Cook basmati rice with just little salt and keep aside
Heat ghee in a wok/kadai/deep pan, add cashew and raisins and allow raisins to pop up and cashew turn little brown.
Remove cashew and raisins from ghee and transfer into a small bowl.
Allow curry leaves to sizzle in the same hot ghee and then add green chillies, onions and fry till onions are mild brown.
Add grated coconut and fry till coconut slightly turns color and changes smell.
Now add cooked basamati rice, salt, cashew and raisins and mix till all the rice is well coated with ghee, tempering and coconut.
Check to see for enough salt
Add coriander leaves if using and remove from heat.
Serve warm with Curried gravies.

DSC04814 Sending this rice to EFM-Variety Rice Series event hosted by Sriskitchen.

Wednesday, December 9, 2009

Tandoori Finger Fish w/ Basa Fish Fillets

AKA Fish Pakoda

BFFF1 
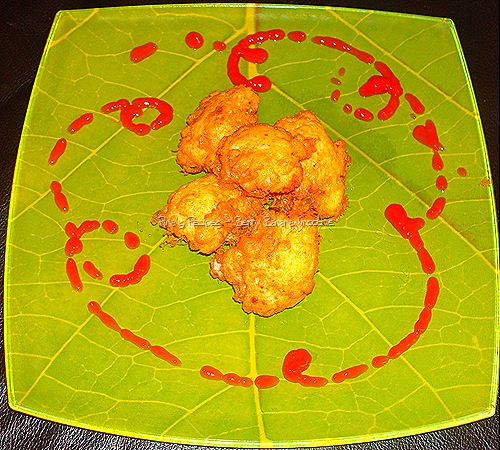
And finally 'Toronto' got its first heavy snow this week, after a record break of snow free November after 162 years. With festive season going in full zoom and the stage set for a perfect winter wonderland, its time to enjoy hot spicy finger food like Basa Tandoori finger fish/Pakoda.

The first time I got to taste this finger fish was from a Indian/Pakistani takeout 2 years ago. I and hubby were completely taken by the taste of it. Moreover my husband is a huge seafood fan. Again no misconceptions here..our seafood menu is very selective and confined only to cooked fish, shrimp/prawn and occasionally crabs. So fish being the main Seafood that we look forward to enjoy..I use to takeout this finger fish whenever I visited this takeout place and also found out from them that they were using Basa fish fillets to make this Tandoori fish pakoda. Then one day I was happy to find raw Basa fish fillet in the Asian grocery store's frozen food section. I took no time to grab one packet of that frozen Basa fish and the thought occured to me "why don't I try the Restaurant style Finger fish at home". I have this habit of trying out restaurant food at home. So I reproduced the takeout/restaurant style at home and it didn't disappoint me. Ever since I started making this at home instead of takeout. Though I made this finger fish a few times, never got a chance to click it. This time since I made and parcelled it to one of my my friend who is expecting, I tried to present it the same way as they do in the take out and clicked the same.

BFFF2 This fish fry makes a good starter dish and is apt to accompany the finger food trays.

So here is my recipe for Tandoori Basa Finger Fish :
Ingredients :
Two Basa fish fillets, cut into thin long strips about a finger length.
Oil for frying.
Marination:
Corn flour/Channa flour - 2 Tbsp
ginger/garlic paste - 1 tsp
Chilly powder - 1tsp
Fish Masala - 2 tsp (I use Shan Fish masala)
Lemon pepper - 1/2 tsp
Tandoori Masala - 1 tsp
Salt to taste.
Garnish :
Onion rings
Lemon wedges
Coriander leaves chopped

Method :
In a mixing bowl add all the marination items with enough water to make a paste.
Marinated the fish strips with the above marination for 1 - 3 hrs
Now either deep fry or pan fry the fish pieces with enough oil.
Garnish with onion rings, cilantro and a dash of lime.

BFFF3

Wednesday, December 2, 2009

Sweet Potato Laddus/Balls

DSC04920 In my previous post of sweet potato, I had mentioned all the goodness that this root vegetable has to offer us. So to find a way or two to include this in our diet helps. In my childhood, apart from eating it just in boiled form, we use to enjoy it when granny adds it to a curry or my dearest aunt used to make these sweet laddus.

In fact once when I was visiting my cousins for a vacation in childhood, my Aunt made these laddus, with which I totally fell in love with. I was all praises for her that she could transform the just boiled sweet potato into this flavourful dessert treat in no time.

After marriage I too try to make these laddus once in a while.

Ingredients:
1 large sweet potato
1 tbsp + 1 tsp Ghee
1 Tbsp Sugar
or
1 Tbsp Condensed milk
1/4 cup grated Coconut
Little salt to add while boiling the potatoes

Directions:
Cut the Sweet Potatoes into large chunks add enough water and salt and Pressure cook for 10 - 15 minutes.
Check to see if the potatoes are done by passing a knife through chunks.
If the knife passes freely, then remove from heat and discard water.
Remove skin once the potatoes can be touched without burning fingers.
Mash them a little and keep aside.
Roast the grated coconut in 1/2 tsp of ghee for a minute or so and add it to the mashed potato.
Now add ghee, sugar, condensed milk to the potato mixture and thoroughly mash and mix till all evenly mixed and the sugar is melted.
Grease fingers with the remaining ghee time to time and make small lemon size balls and serve immediately.
Good accompaniment for breakfasts.

Wednesday, November 25, 2009

A Wholesome Soup with Meat and Vegies

DSC04929 As the cold winter is setting in, who won't crave for a hot soup with goodness of lean meat and fresh vegetables. Add a spoon of rice or noodles this is one wholesome healthy meal for those restful weekends.

DSC04947 Ingredients:
1 lb Meat or Poultry, I used Mutton
2 inch Ginger piece chopped
5-6 Garlic cloves
1 tbsp Black Pepper
1 tsp Cumin seeds
A handful of chopped Coriander leaves
1 French Onion leaks - chopped
Salt to taste
6-8 cups of Water or stalk

To Stir Fry Vegies:
1 tsp I can't believe its Butter or Becel or regular Butter
2 cups sliced Carrots, Beans, Cabbage or any other vegies of choice
Salt and Pepper to Taste

Others:
3 - 4 Tbsp Corn flour
1 tsp Butter
1 tsp ginger garlic paste
Salt and Pepper to taste

Optional :
1 cup cooked plain rice or noodles

Garnish:
Finely chopped coriander leaves
Stir fried Vegies

DSC04937 Method :
In a pressure cooker, add meat/poultry, and all other spices along with water and pressure cook for 30 minutes for meat and 15 minutes for poultry.
Remove lid and let it simmer for about an hour.
Separate the soup from meat pieces using a large filter and discard the spices .
Keep the soup aside.
Shred the meat pieces and set aside.
Now in a wide deep pot, heat butter and add the chopped/sliced vegies and stir fry for 3-4 mins, add salt and pepper, remove from heat and keep aside
To the same pot, add little more butter and add 1/2 tsp ginger garlic paste and saute, add the shredded meat pieces along with some salt and pepper and stir fry for a minute.
Now add the soup water to the pot and let it come to boil.
Meanwhile in a small bowl mix corn flour with a cup of water to make a very dilute solution and add it to the boiling soup.
Allow the soup to become little thick and add the finely chopped coriander leaves and remove from heat.

Serving:
Assemble the soup bowls and pour soup along with some meat pieces.
If adding rice or noodles you can add it now.
Garnish with stir fried vegies, coriander leaves and a pinch of pepper powder.
Enjoy hot with crackers on the side.

DSC04940

Wednesday, November 18, 2009

Cauliflower Egg Pakora/Bhaji/Fitters

DSC04879 This is yet another simple easy snack to make and yet so tasty that you don't want to stop with a few. Thanks to the filling nature of cauliflower which will help from packing on the calories. I liked it so much the first time my husband made this for a light evening snack. Since then "poor man", he ends up making this for me whenever I have a urge to snack on this. I had always expressed my love for cauliflower in this blog. So here is another addition to my cauliflower list.

A simple starter, with very minimal ingredients and ease to make. Doesn't require any dipping sauce or condiments. Can be eaten just like that, to enjoy the flavours better.
With a gentle seasoned covering of crisp egg on the outer and mild soft vegie inside, this is indeed a treat for me.

DSC04888 - Copy Ingredients :
1 small Cauliflower, separated into 10 - 15 florets
2 Eggs beaten
1 tsp Red chilly powder
Salt to taste.
A pinch of black pepper powder (optional)
Oil for deep frying

Method:
Wash the cauliflower florets and dry them with paper towel.
Prepare the covering mixture, with beaten egg, red chilly, salt and pepper powder
Heat oil in a deep fry pan
Dip the cauliflower florets one by one into the egg mixture to coat evenly and thick and gently slide into the hot oil
Fry on medium heat for 3-4 minutes or till the florets turn brown and the cauliflower is cooked.
Once done remove the florets from the oil and place on paper towel to remove excess oil.
Serve warm with ketchup or just as it is.

DSC04891 - Copy

Wednesday, November 11, 2009

Berry Banana Smoothie

DSC04915 
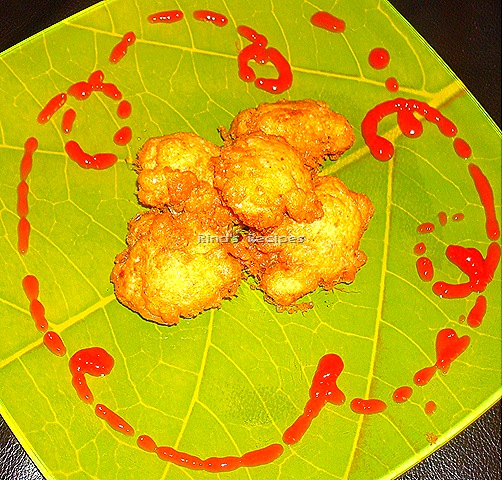
Smoothies have become so regular when it comes for wholesome break fast ideas. One of the best ways to get in the daily required servings of fruits or vegetables. With berries you not only get the benefits of anti-oxidants but also fibre and other essential nutrients and adding banana gives that full feeling. Yogurt and milk satisfy the calcium needs and if thats not enough add a spoon full of protien mix to make it a booster drink to kick start our metabolism.

Since all the ingredients are easily available in our fridge, be it fresh fruit or forzen, yogurt, milk, all we have to do is to throw them in a blendor and and blend till a smooth. My two little boys, luv this smoothie, so I end up making it by demand sometimes.

DSC04900 Ingredients :
1 banana sliced, fresh or frozen
1 cup Mixed Berries, fresh or frozen
1 tsp Roohaza syrup or any rose syrup
1 tsbp honey
1/2 cup milk
1/2 cup water
2 Tbsp plain or flavored yogurt
Add 1 tsp sugar if using plain yogurt. (optional)

DSC04906 Directions:
If using fresh fruits then use ice cubes instead of water.
Mix all ingredients in a blendor and run till smooth.
Serve immediately chill.

DSC04909


Sending this smoothie to Sanghi who is hosting FIL-Fruits event.

Wednesday, November 4, 2009

Kothu Roti / Parotta with Meat Gravy

AKA Muttai Parotta / Minced Egg Parotta
DSC04730 Kothu Parotta has some sweet memories of Nagapattinam/Velankanni beach side restaurants for me. As a small tourist attraction for those visiting Tamil Nadu, Velankkani, has quiet a festive look and the walk from the hotel to the seashore doing some petty shopping at beach side stores is a nice experience. By the time we reach the seashore our hungry belly is wanting the delicious seafood and other delicacies that this place has to offer. I have tasted the best fish fry ever in this place. They cut open a medium size fish and fry it on large tawas with marinated masalas. Not to mention the crab fry. I cannot understand how they can spice up the crab from within with out any gravy hanging out. If this is the seafood side they are nothing less when providing base foods to go with the seafood.
The Elegant Egg Dosa/Muttai Dosa, thin and crepe with beaten egg and masala on it, Parotta with Meen Kozhambu/fish gravy or the famous one and only Muttai Parotta/Kothu roti. I only remember tasting it 3 or 4 times. Often I and husband keep re chanting the memories of this. And it a must try on a visit to this place.

Procedure to make a Kothu Roti/Parotta is quiet interesting. Parottas are shredded into pieces beaten with long metal ladles on a large iron tawa, and egg, onions, gravy and other spices and ingredients are add to it and mixed to get the end result. It was totally new dish for a Telugu girl like me who has never heard about it in Andhra. Only after my marriage during the few years of my stay in Chennai I came to know it. Though in Chennai we do get this kothu Parotta, it is no comparison with the one I tasted in Nagapattinam/Velankanni. It is mostly a eaten for dinner and in Chennai/Tuticoran/Nagarcoil , you can hear the sound of making this dish in small restaurants nearly from very other street corner in the night time. In Toronto every Srilankan Tamil take out has this in there menu with added attraction of any meat/chicken to it. Again the same thing, the taste is no where satisfying near the Kothu Parotta we get in Velankanni.

This said I started to make it at home. Since we get the beaten shredded parotta/roti in the frozen food section in many srilankan Tamil stores, it makes it easy to try this dish at home.

Ingredients :
3 Fresh Parottas/Roti or Store bought Frozen Minced roti
1 Tbsp oil
1/4 tsp mustard seeds (optional)
2 thinly sliced/chopped red or white onions
5-6 Green chillies chopped
a handful of fresh curry leaves
1 Tomato chopped
1 tsp Black pepper powder
Salt to taste
2 -3 Eggs
1 Cup Meat curry (Mutton/Beef/Chicken)
Finely chopped coriander leaves
Lime wedges

Directions:
In a wok or kadai heat oil and allow mustard to splutter.
Add curry leaves and green chillies fry for 10 seconds.
Add sliced/chopped onions and fry till the onion is cooked.
Now add chopped tomato and fry till all the water from it is gone.
Now add the Minced roti or shredded parotta, eggs, salt and peeper and mix well.
Once the egg becomes hard, add the meat curry with gravy and keep stirring till all the gravy stick to the parotta and the out is dry but moist.
Add coriander leaves and remove from heat.
Serve hot with lime wedges.

DSC04740

Wednesday, October 28, 2009

Rava Laddu with Grated Coconut

DSC04719 Though I have a sweet tooth, when it comes to making traditional sweets I have always enjoyed them store bought or prepared by someone else.

As working women we some how squeeze time to cook for our daily meals. So taking time to make something extra like sweets or savouries is not much in my dictionary. I feel investing so much time on making these sweets is not much worth when we can get professionally made ones in sweet stores. More over sugar is one thing that is out of the menu list when it comes to a healthy diet. Nevertheless, blog hopping always inspires us to try new dishes. All the more when it is raining traditional Indian sweets in all the Indian Food blogs.

DSC04757 So this weekend I adventured on Rava laddu. Rava laddu is a traditional sweet made in South India..I think most of our South Indian food blogs have this in their "Sweets Recipe Index". Growing up I was not much a fan of this sweet, except when made by one of my aunt as a must for very Christmas.

Unlike most traditional sweets which take time and difficult steps to make, "rava laddu" can be made in a jiffy. It takes less than thirty minutes to make a plate full of laddus, provided all ingredients are available in our pantry. Its like you just thought to make them and in the next half hour they are ready for the family to enjoy, if you put your thought into action.

There a few different ways to make this sweet. Addition of ghee, grated coconut and milk make it moist and to enhance the flavour cardamom powder is added. After trying for a couple of times I really dicovered the secret of making moist firm laddus which are not too soft or too brittle to break. So here is the test and tried version of my Rava laddus.

DSC04718 - Copy Ingredients :
1 cup Semolina/Rava
1/2 cup Shredded Coconut
2/3 cup Sugar
2 Tbsp Ghee
1 Tsp Cardamom powder
2-3 Tbsp milk
2 Tbsp Cashew nuts and Raisins mixed

DSC07222 - Copy

Directions:
Heat 1 Tbsp of ghee in a pot/Kadai/Pan, add cashew and raisins and fry till raisins are puffed up and cashew changes color slightly. Drain and remove. Set aside
Now add Grated Coconut and roast for a minute or two and then add 1/2 tbsp more ghee and add the rava to roast it thoroughly.
Keep stirring continually for 5 - 7 minutes coating the rava with ghee and mixing it with coconut. Add the cardamom powder and mix well.
Add sugar and keep stirring till the sugar is almost dissolved.
Add the roasted cashew and raisins.
Now add 1 Tbsp of milk and mix thoroughly as the rava tends to thicken up.
Remove the container from heat and spread a part of the rava mixture on a greased plate.
To this part add enough milk when still hot and mix to keep the rava moist and to make the laddus easily and to retain their shape.
With the remaining ghee keep greasing the fingers and quickly make ladoos of small lemon size.
Repeat the same with the reamining portion of rava mixture.
Usually for one cup of rava you can get 8- 10 laddus.
Store in a air tight container for up to a week.
DSC04755 Sending the Rava laddus for the Food blog events Sweet Series hosted by Sirisha and FIL -Ghee Sweets hosted by Sanghi

Thursday, October 22, 2009

5 Spice Easy Breezy Chicken Roast

DSC04683
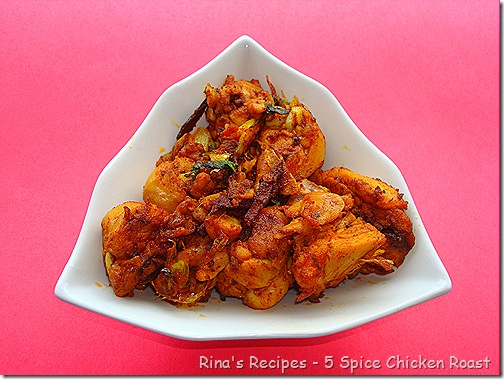
We working moms are in constant search of quick meals prepared with ease and readily available ingredients. No chopping onions, or grinding ginger garlic paste or pureeing tomatoes or making coconut paste. This dish is one of my favorite chicken recipes my mom used to make. In fact she is the chef behind this dish. And all my family and relatives used to enjoy this chicken preparation when ever amma made it.

Since it is a dry preparation its stores good too. In those days when my Dad use to work in a different province my mom use to pack this chicken for him to go in the long train journey along with my grand mother lemon rice. Since then Lemon rice and this dry chicken became my favorite that I try to make lemon rice to go with it most of the times I cook this chicken.

DSC04679 This time also made some mango dhal so that we can enjoy this chicken with plain rice also.

DSC04694 It wipes away the notion that too many ingredients or complex recipe contribute to great taste. Because with a few steps and and less ingredients this dish is so flavourful and tasty that it amazes me whenever I cook it.

DSC04699 Whats Needed:
1-1/2 lb chicken bone in , skinless, cut into curry size pieces
2 Tbsp Oil
1 tsp red chilly powder
1/4 tsp turmeric powder
Salt to taste
Coriander leaves to garnish

5 Spices :
1 Big Cinnamon Stick broken
6-8 Cloves
6-8 Cardamom
2 inch Ginger julienned
6-8 Garlic pods slightly crushed

Directions :
Clean chicken of any fat and wash thoroughly.
Season it with red chilly powder, turmeric, and salt, keep aside
Heat up a wok or Kadai, add oil.
After the oil is hot add the dry spices first and fry till slight color change.
Then add ginger slices and crushed garlic pods and fry all together for a minute till beautiful aroma emits.
Now add the seasoned chicken and mix well to coat it with spices and oil.
Do not add any water.
Roast till the chicken turn color and is fully cooked.
Keep stirring in regular intervals to see that the chicken is not burnt.
Once the chicken is done, garnish with coriander leaves and remove from heat.
Serve with lemon rice or plain rice with rasam, sambar or dhal.

DSC04690

Friday, October 16, 2009

Peanut Chutney

pc3 This is yet another chutney which is easy to make and so tasty that it goes with most of the South Indian tiffins, Idly, Dosa, Upma, Adai, Pesurattu, Uthappam, Rava Dosa etc..

Back home I use to help my grandmother grind this roasted peanut chutney whenever she made pesarattu. Now it isa staple at my home to make it as an accompaniment for Upma. Kids enjoy it too..Moreover boths my boys are peanut fans..so its hard to keep them away from the nuts when I'm shelling the roasted peanuts..

pc1 Ingredients :
To Grind :
3/4 cup roasted peeled peanuts
4-5 green chillies
1 tsp cumin seeds/Jeera/Jeeragam
A big marble size Tamarind ball
Salt to taste
Enough water to grind into a smooth chutney

For Tempering/Tamlimpu:
1 tsp oil
1/2 tsp mustard seeds
1/2 tsp urad dhal
2-3 red chillies cracked
8-10 curry leaves
1 pinch of Asafoetida/Hing/Inguva/Perumgayam

Directions:
Soak tamarind in just enough water to make it soft for grinding.
Remove stems and slit green chillies into half
Combine all the ingredeints in the grindling list with enough water and grind into a smooth chutney.
Transfer to a serving container
Heat up the small tempering vessel add oil, after the oil is hot, allow mustard to splutter and add the rest of ingredients one by one ending with Asafoetida, fry for a few seconds and spread on the prepared chutney.
Enjoy with dosas, idly, pesarattu etc.

pc2

Friday, October 9, 2009

Chicken with Chettinad Fusion

cwcf1 Its Thanks giving weekend in Canada. So if not the big bird "Turkey" definetly this recipe for the small bird should work out.
Think about red chillies, pepper corns, cumin/coriander seeds, fennel seeds, curry leaves the first thing that comes in mind is Chettinad cuisine. Though I didn't use all those ingredients here in this recipe..which is why I only call this dish a chettinad fusion..I'm happy to come out with a different chicken preparation which is easy to make and tasty to cherish.
This recipe is inspired by Sig's Chettinad Chicken curry, with my addins and modifications.
Having the basic ingredients of Chettinad cooking like Red chillies, Fennel seeds(saunf), Black pepper, Curry leaves..etc, this turned out to be one different and satisfying chicken recipe that didn't dissappointment me and also got laurels from my partner.

Whats needed:
1-1/2 lb of Chicken, bone in, Skinless, cut into regular chicken curry size peices
1 Tbsp Oil
1 big medium size Onion, cut length wise
5 - 6 Red Chillies stems removed
1 tsp Fennel Seeds
8 - 10 Curry leaves
1 Tbsp Ginger Garlic paste
1/2 cup Crushed Tomato puree
1 tsp Red Chilly Powder
1/2 tsp Tumeric Powder
1/2 tsp Black Pepper Powder
Salt to Taste
Finely chopped coriander leaves to garnish.

Directions:
Wash and clean chicken of any fat.
Add turmeric, and red chilly powder along with enough salt to the clean chicken, mix and keep aside
In a wok or kadai, pour oil when hot and add the fennel seeds and fry.
Now add red chillies, curry leaves and fry taking care not to burn.
Add Onions and fry till translucent
Add ginger garlic paste and paste fry till rawness is gone.
Add Tomato puree and keep stirring till it leaves oil.
Now add the marinated chicken peices and mix well to coat the chicken peices with the masala.
Allow the chicken peices to roast along with the masala for about 15 - 20 minutes till the chicken masala mixture leaves oil.
Add the black pepper powder mix well.
Garnish with coriander leaves and remove from heat.
Serve hot with plain with rasam or tempered rice.

cwcf2
And a Happy Thanks giving to my Canadian friends.

Monday, October 5, 2009

Uthappam

DSC04550 Uthappam has loads of childhood memories. Every Friday evening/night tiffin was this Onion Uthappam back home. I would passionately wait for that Friday night when my mom used to make the tastiest uthappam for us. Though I was never able to come near the uthappam that my mom made because I use oil very sparingly, still that taste and smell linger in my mouth after years. In my early college days when I use to attend my maths tuition early in the morning, a hungry me would come home and while rest of household would eat idly as breakfast, I would make myself this tasty uthappam(spoilt Uh !!!!) and enjoy before i get into my routine study schedule. Then during my Bachelor's Degree, I use to end my Friday fasting with my grand mother's uthappam in the night with either raw onion chutney or coconut roasted gram chutney.
DSC04544 Uthappam though a Tamil word but equally recognized in Telugu and in almost all South Indian restaurants this is a tiffin item in the menu. Mostly consumed for breakfast or dinner. Usually in every South Indian home the left over idly batter is use to make Uthappam for the next meal. Again whether using rice or rice rava to make idli, Uthappam can be made with either of the idli batters. Also either the chopped onions, green chillies and other spices can either be spread on the flattened batter or can be mixed earlier in the batter itself, depending on one's preference.

DSC04545 Whats needed :
2- 3 cups Idli Batter
2 medium size chopped Onions
5 -6 Green Chillies minced
1 Tbsp cumin seeds (jeeragam/jeera)
Enough Oil & salt

Procedure:
Add around half cup of water to the idli batter to make it dilute and stir well
Heat the dosa tawa/non stick pan and grease it with a enough oil
Spread a big laddleful of uthappam batter in a circular shape with 1/3 inch thick on the heated tawa/pan
Add some cut onions, green chillies, cumin seeds from the centre towards the edges.
DSC04537
Cover and cook on medium heat.
Remove lid to check if the base is golden brown, flip onto the other side and cook till onions are done and the uthappam is cooked.
Serve hot with Raw Onion, ginger or Coconut chutney.

DSC04547

Monday, September 28, 2009

Raw Onion Chutney

DSC04541This is one chutney that can be made instantly in a jiffy. Was regularly made by my mom and grand mother in my childhood and college days, whenever we made idlis made at home.

I quickly adapted this after my marriage because of the ease of making it. There is no frying ingredients before or no tempering required after grinding. Its ready in just five minutes. Just peel the onions, chop them, throw in other ingredients that go into it, press the button to grind, and there you go..its ready.

But since its raw onion you get best results if the chutney sits for a while in the fridge, till all the pungent nature of the onion is gone, The cumin, dried red chillies, tamarind and sugar really transform the onion into a flavourful chutney.

Raw onion chutney is the best side dish, for Uthappam, Idlis, Pesarattu. It is a perfect combo with one other Tamil speciality called Adai. A pancake made with the batter of different ground dhals mixed with spices..Hope to blog about it sometime.

For now into the recipe of Raw onion chutney.
Ingredients :
To Grind:
2 Medium sized Onions chopped into pieces
2 tsp cumin seeds (optional)
5-6 red chillies cracked
1 big marble size tamarind ball
1 Tbsp sugar
Salt to taste
Enough water to grind these into a smooth paste

Method:
In a chutney grinder, put all the ingredients in the grinding list and grind them thoroughly to a smooth paste/chutney.
Transfer to a serving bowl

DSC04539 Serve with hot idlis, dosas, Uthappam, Pesarattu, Adai etc..

Monday, September 21, 2009

Idli with Coconut Chutney - A Humble Combo, A bond indeed

DSC04516 The relationship of a south Indian with Idli and coconut chutney so intense that we can write pages about it. This is one break fast that we South Indians grew up on back home.
I call it a humble combo because every household can afford to make it at home or even to take out from the near by breakfast restaurant or get from small street side stalls. I grew up in a joint family along with grand mothers, uncles and aunts. Idli is one easy breezy breakfast to feed large families. At my house back home it was a staple breakfast 2 to 3 times a week. Though I was not so fond of it those days and never use to eat more than 1 or 2, I very much long for Idly and coconut chutney in this part of the world. Obviously we know the value of things when we can't get them so readily. With very few South Indian restaurants in Toronto you got no option then to enjoy home made idlis and chutney. And I do prefer it than store bought..Though the preparation takes a few long steps, and involves using lot of equipments like wet grinder, Idli moulds and pressure cooker, scooper etc..it’s all worth to go through the process and enjoy it at least in the weekend. All the more when the whole family including my 3 year old loves it.

DSC04512 Idli is prepared mainly in two different ways. Though there are many other variations and varieties of Idlies. In Tamil Nadu they use whole rice and Urad dhal(White Lentils with Black husk on them usually called black gram) and in Andhra(at least in my home, I don't know in other parts) we use Rice Rava(Cream of Rice) and Urad dhal and also the proportion of rice or rice rava and urad dhal differs.

For a Tamil Nadu style idly I use 1 cup urad dhal to 3 to 4 cups rice( par boiled or combo of par boiled and raw rice or the Tamil nadu special idly rice), soak them separately and grind them separately. Usually the urad dhal is grinded to very fine batter and the rice is grinded to hold rava constituency, then both are mixed together with salt and allowed to ferment overnight, where by morning the batter almost rises to double or triple, so that you get that soft fluffy idlis.

With Andhra Style, I use 1 cup urad dhal to 2 to 3 cups rice rava(usually call Idli rava), soak them separately and then urad dhal is grinded to very fine batter and the rice rava is squeezed from all water and added to the ground urad dhal then both are mixed together with salt and allowed to ferment overnight. Unlike the batter made with whole ground rice, this one doesn't rice so much , but is good enough to make delicious idlies.. I find this method is easy too..as we need to grind the urad dhal only and add it to the already made rice rava.

Though home made idlis and chutney are tasty and hygenic..I still long for that street side idli and coconut chutney..I still remember those days even in a good restaurant a plate idli use to be only 1 rupee 25 ps with unlimited chutney. Just the smell of this combo was a simple pleasure. Mini idlies soaked in hot sambar topped with ghee is a frequent site for breakfast or lunch in Chennai restaurants.

Now if I don't get to some serious recipe time, I will never go out of my ranting.
For cream of the Rice (Rice rava)Idlis:

Ingredients :
1 cup urad dhal
2 to 3 cups Rice rava(Idli rava),
Salt to taste
Water enough to grind and mix
2 Tbsp Yeast (if desired) I usually don't use

Method:
1.Wash thoroughly and soak urad dhal for althea 3 hours.
2.Simultaneously soak rice rava separately.
3. Wet Grind urad dhal to very smooth batter, keep aside.
4. Now squeeze rice rava from all water with palms and added to the ground urad dhal. 5. Then add salt and enough water and mix thoroughly till all the rice rava and ground urad dhal combine well and mix into each other.
6. Allow this mixture to ferment overnight.
Tips : In cold places fermentation is a challenge. So I usually follow these steps. Always use thick steel vessel to ferment the batter. Heat up the oven for a few seconds, turn off and then place the steel vessel on the oven rac. Let it stay in the oven overnight isolated by the colder temperatures outside. You can repeat that process a few times for better results, if the temperature outside is too cold. Remember to place the steel vessel with batter on a wider plate when placing in the oven..at times the batter ferments and rises so much that it overflows on the oven rac..
7. After the overnight fermentation when the you are ready to make idlis, mix the raised batter, adjust salt if necessary keep aside.
8. Fill 2-3 cups water in the Idli Steamer depending upon the size of the cooker and heat up till the water starts to boil.
9. Meanwhile grease the idli moulds with oil or ghee and add a ladle full of idli batter into each single mould, taking care that the batter does not overflow the mould.
10. Now insert the idli mould plates into the idli steamer and steam on high first and then medium heat, for 15 - 20 minutes depending on the size and the number of idlis.
11. Once the time elapses, check to see if the idlis are done and then remove from heat.
12. Sprinkle cold water on the hot idly mould plates and use a special idly scooping spoon to separate the idlis from each mould.
13. Serve hot and fresh with choice of chutneys, podi/powders or gravies.

Coconut Chutney :

DSC04515 Though Idli can be eaten with various accompaniments like, chutneys, podis, curried gravies like fish, chicken, lamb; one best combo for Idli always rules..that is Idli with Coconut chutney.
Like variations in Idlis making, Coconut chutney is also prepared in a number of varieties..and different combination of ingredients.

1. Coconut with roasted gram with green chillies, yogurt based
2. Just with Plain Coconut
3 Coconut with roasted gram with red chillies
4. Coconut with peanuts & green or red chillies
5. Coconut with Coriander/mint leaves and green chillies

Here let's see the making of first variety mentioned above.
Coconut with roasted gram with green chillies, yogurt based:
Ingredients :

To Grind:1 cup grated fresh/frozen coconut
1 cup roasted gram/vepina chenaga pappu/varutha kadala parippu
1/2 cup sour yogurt
1 tsp cumin seeds (optional)
4 green chillies (increase or decrease accordingly)
1 marble size tamarind ball
Salt to taste
Enough water to grind these into a smooth paste

For Tempering/Tamlinpu:
1 tsp oil
1/2 tsp mustard seeds
1/2 tsp urad dhal
2-3 red chillies cracked
8-10 curry leaves
1 pinch of Asafoetida/Hing/Inguva/Perumgayam

Method:
In a chutney grinder, put all the ingredients in the grinding list and grind them thoroughly to a smooth paste/chutney.
Transfer to a serving container.
Heat up the small tempering vessel add oil, after the oil is hot, allow mustard to splutter and add the rest of ingredients one by one ending with Asafoetida, fry for a few seconds and spread on the prepared chutney.

DSC04506Serve with hot idlis, dosas etc..

Now that we made both Idli and Coconut chutney lets enjoy this combo.
DSC04517