Saturday, December 4, 2010

Mango Kesari

AKA Mango Sujji Halwa / Mango Rawa Kesari
DSC08335Can't believe its December already and we have less than a month to start another new year. December brings the sweet memories of preparing and celebrating Christmas back home..oh how I miss home especially this season. Thought it would be nice to post a sweet dish to kick start this festive month.
DSC08331
Regular readers of my blog would have followed my desserts with semolina. Its like I started making kesari with different fruit flavours..pineapple, banana and now mango..yea blog hopping one day lead me to Mango kesari..and boy it was simply delicious, though i was not welcoming the idea in the beginning, this turned out to be a really flavourful fudge like dessert. Choose ripe sweet mangoes or good quality sweet mango puree for better results.
DSC08339
Ingredients :
3 to 4 Tbsp - Ghee
1 cup - Semolina/Suji/Rawa
3 cups - Pureed Alfonso Mango pulp (I prefer Kesar brand)
1 cup Sugar
1/4 Tsp Cardamom powder
Few Saffron strands
2 Tbsp - Choice of nuts and dry fruits( I used cashew and raisin)
DSC08340
Method :
In a wide pan, melt ghee and fry cashew and raisin till color change, strain and remove. Keep aside.
In the same pan, add one more tbsp of ghee and add rawa to roast evenly till semolina turns the color slightly.
Now add mango pulp, slowly and mix thoroughly into the rawa. Keep adding and mixing till all the mango puree is incorporated into the semolina.
Add sugar and saffron milk and mix till sugar caramelizes and dissolves into the mango rawa mixture.
Add salt and cardamom powder.
Add the remaining ghee and continue mixing till the kesari leaves the surface.
Add half of the nuts and raisins. Remove from heat.
Pour into a greased tray. Cut into desired shapes or just scoop into serving dessert bowls and garnish with remaining cashew and raisins.
DSC08330

Saturday, November 27, 2010

Count down to Christmas with Banana walnut cake

Banana walnut cake 1
With chill winds blowing, snow flakes coming down, carols sounding, decorations all around it sure is a season for Christmas..so much so is the reason for baking yummy treats..watch those holiday cals!!!

Ripe bananas always tempt me to bake a banana cake..and since I'm fond of nuts too,so incorporated walnuts which are rich in Omega-3 fatty acids. A bit of health throw in..kind off!!! So Banana Walnut cake is a perfect combo for flavour and crunch.

Sorry no cake left after slicing to take pictures of slices..
Banana walnut cake 2
Ingredients
400 gms butter(softened)
2 cups sugar
5 eggs

Flour & Powders:
2 cups all-purpose flour
1 tsp baking powder
1/2 tsp baking soda
1/2 tsp ground allspice (optional)
1 pinch salt

Liquids:
1 tbsp Banana extract
1 tbsp lime juice
1/2 - 1 cup Evaporated milk

Fruit & Nut:
1/2 - 1 cup Walnuts (chopped)
1 or 2 Bananas

bwc3

Directions:

Chop Walnuts

Mash Bananas into smooth paste.

Preheat oven to 350 degrees F (175 degrees C). Grease and flour your desired cake pans. I used a loaf pan and a square pan.

Measure all ingredients and keep them ready, Take butter out of fridge before an hour to soften it.

Beat butter, sugar in a large bowl until they turn creamy Add in eggs. Beat on low speed of electric mixer until blended, then on high speed for 5 minutes until light and fluffy.

Combine and swift together flour, allspice(if adding, baking powder, soda and salt in a separate bowl, and fold these dry ingredients alternately with liquid ingredients except milk. Keep mixing

Add Mashed Banana. Add milk if necessary according to the consistency of the batter. Keep mixing while adding. Add chopped walnuts. Gently mix to combine.

Pour into Prepared greased pan/pans.

Bake in preheated oven for 50 - 60minutes, usually banana cake longer time to bake.

Tip : During the baking process, when the cake rises and gets the shape and is browning on the top, then remove from the oven and cover it with foil, shiny side up, and bake for the remaining time or until a knife inserted into the center comes out clean.

Let cool in pan for 10 minutes, then turn out onto a wire rack and cool completely.

bwc4

Tuesday, November 16, 2010

Vazhaipoo vadai / Banana Flower Fritters / Aarati Puvvu Vada

DSC08093The first time I tasted this was at one of our friend's house back home in Chennai. Her mom prepared these. I had no clue what they were. And it being a Tamil savory never got to taste growing up. Only thing I remember was these tasted damn good. They look and taste like our regular masala vada but definitely something different. Ever since wanted to know how it was made., but never took the leap to make it myself..Many a time I even bought the Banana flower, stored it in the fridge but never got time to make these, because of the time consuming part of cleaning the flower. Finally one day with help from my husband in cleaning the flower I made these at home. I never intended to have a photo shoot with these..so please don't mind my presentation. Will surely replace them with better ones if I happen to make these again.

Also Will update later with the pictures of Banana flower and the cleaning process
DSC08095Ingredients:
3 cups Banana flower - Thoroughly cleaned and finely chopped
1 cup Channa Dal soaked for 2-3 hours and ground into a coarse paste
5-7 Green Chillies chopped
Handful of Curry leaves
3/4 tsp Fennel Seeds/Saunf
A pinch of Asafoetida & baking soda & turmeric each
Salt - to taste

Enough Oil to deep fry

Method :
Add all ingredients except oil, in a deep bowl and mix into a paste like below
Heat enough oil in a pan.
DSC08090Once the oil is hot enough, take a small amount of the mix, shape them into round vada and drop them gently into hot oil.
Just the way we do masala/paruppu vada
Deep fry them till they are golden brown on both sides by turning once in a while.
Then remove from heat and drain them on paper towels.
Can be serve as starters or snack with evening tea.
DSC08092

Wednesday, November 3, 2010

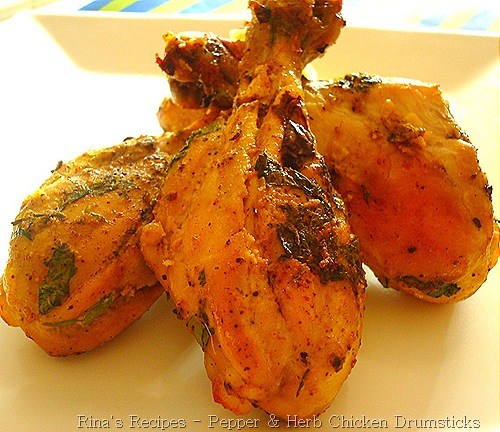
Pepper & Herb Chicken Drum Sticks

DSC05990
Can't believe we are already in the 11th month of 2010. Looks like we just started a new year and now in a couple months, its gone. Out of many projects for me this year, a serious blog make-over is long due. In the past 3-4 years though I changed the style & banners a couple of times..a sophi look and an own domain is most aspired..All the more when I'm will be submitting my posts to be published in a Toronto Desi portal. Don't know whether it is possible this year, as other priorities hit the list..Well, may be in the new year...better late than never..Infact I'm holding back many good posts for the same reason that I want to publish them with on a new look.

Coming to good food part for kids after all that loads of sugar, from goodies from Halloween, I have this kid friendly chicken drum sticks. By all means this is so flavourful that adults can enjoy too. But definitely falls into that category where spice and flavour here favour kids too. Totally my own creation, especially for my picky 1st grader and honestly worth trying as I received laurels from my girl friends too.

Ingredients :
7-8 Chicken drumsticks skin removed
1/4 cup Yogurt
1 Tbsp Ginger Garlic paste
1 Tsp olive oil
Salt to taste

Spices :
1 Tbsp Black Pepper Powder
1 tsp Garam masala (home made)

Herbs :
1/2 cup each of Coriander and Mint leaves chopped

Procedure :
In a large bowl combine cleaned chicken with all the ingredients mentioned in all sections.
DSC05976
Marinate for at least 30 mins

Preheat oven for 350F.

Line a Baking/Roasting try with aluminium foil and grease it with olive oil.

Arrange on the chicken drum sticks on the tray.
DSC05977
Roast the drum sticks for 20m and turn over and roast again for 10m

Now Increase heat to 400F and roast for 2-4m or till chicken is golden brown.

Remove from oven and serve with baked potatoes or veggies.

DSC05979

Friday, October 29, 2010

Cabbage Pepper Tomato Curry

AKA Cabbage Miriyalu-Tamata Kura/Moottagose Milagu-Takali Kuttu
DSC06846 I am happy that I like this cancer fighting vegetable "Cabbage".
It is such a versatile vegetable that can be added in other soups as toppings, fried rice, made into a curry, added with some other ingredient to make a stir fry, used to make fritters, used in stews, pureed to make cabbage soup, make rolls and the list goes on.

Some south Indian cabbage dishes that I'm used to are, Cabbage with Coconut stir fry(Cabbaggee Kobbari), Cabbage with Spicy Pickle chutney(Cabbagee Karam), Cabbage with Channa Dhall (Cabbaggee Chennaga pappu), Cabbage Tomato(Cabbagee Tomata) whose one step up is the Cabbage Pepper Tomato Curry. Hope to blog some in the list in the near future.

Growing up never ate much when amma prepared any type of cabbage curry. It was always one of Aunt's and Granny's preparation of cabbage curry I preferred. This is one unique way Granny use to cook this vegetable. I have no clue how she thought of adding black pepper to a tomato based dish. But it works exemplary. Totally gives a new flavour to the regular Cabbage tomato curry.

DSC06839
Ingredients:
Cabbage - 1 half (chopped)
Oil - 1 tbsp
Mustard - 1/4 tsp
Onion - 1 small
Green Chillies - 3 slit
Curry leaves - 8
Chilly powder - 1 tsp
Black Pepper powder - 1 tsp
Tomatoes - 3-4 or Tomato Puree/Crushed Tomato - 1 cup
or Tomato Paste 3-4 Tbsp
Salt - to taste
Coriander leaves - a small bunch

Procedure:
Add oil in a heated Kadai/Skillet, allow mustard to splutter and then add cut onions, green chillies, curry leaves and saute till onions turn slightly brown.
Add radish, chilly powder, salt, and mix well to give an even coat of all ingredients.
Sprinkle some water and cover with lid to cook the cabbage in the steam for about 15- 20 minutes. Keep mixing periodically and sprinkle more water if required.
Once the cabbage is almost cooked add the tomato puree, mix well.
Cook for another 5-7 minutes or till cabbage absorbs the tomato flavour.
Now add generous amount of black pepper powder and mix.
Add finely chopped coriander leaves just before removing from heat.
Serve this with rice or roti,

DSC06849

Wednesday, October 20, 2010

Spinach Omelette w/ Indian Fusion

DSC06739 When I am on SBD this is my keeper recipe for breakfast..especially on phase one where no carbs are allowed. So spinach is a replacement for the starchy bread and to make you feel full. I make it so often that even kids started liking it and poor me have to share it with them..good and bad for me. This can be served just by itself or accompanied by oat meal or fresh veggies and coffee on the side.
My perfect combo is this with either a legume salad or freshly sliced sweet peppers and a sugar free decaf.

DSC06736 Ingredients :
2 large Eggs or use Egg Substitute ( I use 2 whites & 1 yellow)
2 cups washed chopped spinach
1/2 tsp olive oil
1/4 tsp cumin seeds
1 or 2 Red chillies broken into pieces
4-6 Curry leaves
Salt and Black pepper/red chilly powder to taste

Method :
Add oil to a heated tawa/pan.
Once the oil is hot allow cumin seeds to splutter, then add curry leaves, red chillies and fry without burning.
To this add chopped spinach and cook for a min or two, add enough salt and pepper.
Now spread the cooked spinach on the tawa and break the eggs on it and distribute the eggs evenly to cover the spinach.
DSC06719Add more salt and pepper or red chilly powder.
Once the bottom hardens turn it to the other side.
Cook for a minute and remove from heat.
Serve hot with mixed bean salad or chat to make a healthy breakfast or brunch.
DSC06738

Saturday, October 16, 2010

Mutton Biryani - Spicy South Indian Style

DSC06016
This week being dedicated to husband appreciation...on the gastronomy part a little pampering him with a George Foreman Grill and also trying to make some of his favs..and the first thing he always want is Biryani..All the more when he was sick with flu and it was Thanksgiving week too.

Below is one easiest method to get this traditional dish on the dinner table for family and friends. Since the meat used is mutton, using a pressure cooker definitely speeds the cooking process. Again this is one of many ways that Biryani is made. The ingredients and the procedure differ to some extent in each type.

DSC06011
Ingredients:
2 lb Mutton (Leg with bones cut into medium size pieces)
3 cups Basmati Rice (Washed and soaked for 30 mins)
3 Tbsp oil/ghee
5 Bay leaves
5 medium or 3 big Onions cut length wise thinly
6-8 Green Chillies
4 Tbsp Ginger Garlic paste
3 Medium size Tomatoes quartered
1/2 tsp Turmeric powder
2 Tsp Red Chilly powder
2 Tsp Coriander Powder
2 Tsp Garam Masala powder(home made)
1/2 cup Curd/Yogurt
Water 3-4 cups
A bunch of Mint and Coriander leaves
Salt to taste

Procedure :
Add a little red chilly powder, salt and turmeric to the mutton pieces with a few drops of oil, mix thoroughly and keep aside.
Wash and soak basmati rice.
In a pressure cooker heat some oil/ghee, add bay leaf, sliced onions and green chillies.
Fry until onions turn golden brown.
Add ginger garlic paste and fry till the rawness is gone.
Add half of the mint and coriander leaves and fry.
Now add meat and fry well.
Add Chilly powder, Coriander powder, salt and fry again.
Add garam masala and fry till the pieces absorb the flavour.
Add tomatoes and cook till soft.
Add yogurt and cook till oil separates.
Add 1/4 cup of water mix and pressure cook for 20-25 mins
After that time, release pressure, remove lid and check to see if the meat is cooked.
DSC05997
Now add rice and fry again.
DSC06000
Now add enough water depending on the amount of gravy present, approximately 3-4 cups.
Add more salt and mix.
DSC06001
Pressure cook again for 7-10 minutes.
By then all the water is evaporated and the rice is cooked.
Release pressure, uncover, and then add the remaining herbs.
DSC06004
Transfer the biryani to a serving dish.

DSC06009
Serve hot with raita or egg plant masala.