Showing posts with label Non-Veg. Show all posts

Tuesday, January 31, 2012

Spicy Meat Roast


3

Did you miss me?? I guess yes!!! Well, though I couldn't post last 2-3 months, I'm glad to be back again..Food blogging is a passion for life time you know. If not the first day of the year, Here I'm the last day of the first month. My my see, how January has gone I like a breeze.. 6
So let my first post of this year start with some real spice. Here's to all meat and spice lovers..presenting a spicy meat roast.
Choice of your meat, preferably red meat and go for rib eye of eye of round cut. Meat is cut into small cubes and pressure cook with various masalas and then comes the intresting part of tempering it with dry spices with elevates the level of taste to an extreme satisfaction7
Ingredients :
1 lb meat
2 + 1 Tbsp of Ginger Garlic paste
3-4 Green Chillies Slit
1 + 1 Tbsps of Olive or Sesame oil
1/2 tsp Turmeric
1/2 tsp Red Chilly powder
1 Coriander powder
3/4 + 3/4 Tbsp of Garam Masala powder
1 tsp Fennel seeds
5-6 Red Chillies dry
10 or handful of Curry leaves
1 big Onion sliced

Method:
Place meat in the pressure cooker and to it add 1 tbsp each of ginger-garlic paste, oil.
Add ginger chillies, turmeric, chilly, coriander and 3/4 spoon of garam masala powders.
Add 1 cup of water and pressure cook for 25 minutes or more depending upon the choice of meat. Once the meat is cooked empty it in an vessel and keep aside.
Heat oil in a wok or kadai.
Roast fennel seeds till aromatic.
Add red chillies fry for 5 seconds till color slightly changes.
Add Curry leaves and fry till crisp.
Add onions and roast half cooked.
Add remaining ginger-garlic paste and fry.
Now add the cooked meat with gravy and keep stirring thoroughly till all the waters evapourates. Sprinkle remaining garam masala powder mix well till you can smell the aroma of the spices. Remove from heat and transfer into a serving bowl. Serve hot with Rice and Dhal curry or sambar.
If you are on low carb diet, skip teh rice and have it as side with any stir-fried or baked veggies.
I bet you will say "Yummy!!!"

8

Tuesday, September 20, 2011

Mixed Fried Rice

DSC00427This dish needs no introduction..A staple in all Indo-Chinese restraurants and a must with any oriental side dish, like chilli chicken, manchurian, ginger chicken, sweet and sour varieties.
DSC00415
Again fried rice is so versatile dish. Sure they are hundreds or thousands of varieties of this type of preparation and this is only one of them.
DSC00417
Ingredients:
4 - 6 Cups Cooked Rice(Preferably Basmati)
2 tsp Sesame oil
5 Thai or regular Green Chillies slit and cut diagonally
1 big Onion cut length wise
2 Tbsp fresh ginger garlic paste or use freshly chopped
1 Egg (beaten and scrambled)
2 Cups choice of veggies diagonally crated (Carrots, Cabbage, Green Beans,)
Choice of meat, poultry, seafood(Small peices Chicken, beef, mutton/lamb and small variety shrimp/prawns)
2 Tbsp Soya Sauce
1 Tsp fish Sauce
1 Tsp Green Chilly Sauce
1/2 Red Chilly Garlic Sauce(completely optional..I didn't use)
1/2 White Vinegar
A few sprinkles of Cooking Wine
A pinch of Aginomoto(optional)
Salt to taste
Spring onions chopped, one half to add while frying and the other for garnishing.
DSC00420

Procedure:
In a wok, heat oil, sizzle green chillies.
Add Onions and cook till crispy
Add ginger garlic paste and saute'
Add half of spring onions and saute'
Add Chicken, meat and seafood and salt and dependign fresh you are using fresh or cooked give time to cook or warm up.
Add half of the sauces at this point.
Now add the Chopped veggies, some salt and stir the veggies till crispy and cooked, for 5 -7 mins or so,
Add aginomoto if using.
Now add the cooked plain rice along with all the remaining sauces.
and combine well to coat all the grains evenly with the mixture.
Add scrambled egg.
Add enough salt again and mix well.
Transfer to a serving bowl and Garnish with spring onions.
Serve with choice of any Indo-Chinese Side dish.
DSC00432

Saturday, September 17, 2011

Curried Minced Meat w/ Ridge Gourd

------AKA Kheema Birakaya/Birakankai Kheema-------
DSC07176
Kids back to school last week after that long summer break and though fall is going to officially start next week, it seems like winter is already here..And chill weather always calls for something soothing and comforting..and think about comfort food its always authentic dishes from home afar..One such comfort food for me is a cup of hot rice with this preparation of minced meat and veggie..

The combo of a non-veg and veg is always a hit and it got to be when it is an Andhra preparation. So here is yet another scrumptious dish straight from amma's kitchen. Being a Tamilian, my husband is not so used to these combos. Though he loves Andhra cuisine and by all means my cooking, the first time I mentioned I'm preparing Kheema(Minced meat) with Ridge gourd(Birkankai - Tamil) he had his eyebrows raised but totally got bowled with the result..
DSC07184

So for those who enjoy Indian cooking and don't mind eating meat, next time pickup a pkg of minced meat and a pack of Ridge gourd(readily available in most of the South Asian stores) when you grocer and let your kitchen be filled with the aroma of this side dish.

Ingredients:
2 to 3 long - Beerakaya/ Ridge Gourd / Beerkankai (De-skinned and chopped into small cubes)
1 to 1.5 lb Kheema ( Mutton/Beef)
2 tsp oil
2 medium Onions chopped
4-5 Green Chillies slit
A Few Curry leaves
1 Tbsp Ginger garlic paste
1/2 tsp Turmeric
1/2 tsp Red chilly powder
1 tsp Coriander pwdr
1/2 Cumin pwdr
1 tsp garam masala powder(Home Made)
Salt to taste
Finely chopped fresh coriander leaves to garnish
DSC07179
Procedure :
Heat oil in a pan/wok and add chopped onions, slit green chillies, curry leaves, and cook till onions are translucent.
Add ginger garlic paste and cook till rawness is gone.
Now add minced meat(kheema) and salt.
Add garam masala powder
Mix well.
Cover and simmer for 8-10 minutes or till the kheema changes color, stirring occasionally.
Add chopped ridge gourd pieces to the kheema curry and cook till both are is fully done.
to upload7
Sprinkle some water if too dry while the kheema is cooking.
Cook till the ridge gourd almost gets disappear in the kheema..much like the pic above..follow the pics anti clockwise..
Once the kheema is cooked and oil starts oozing from the sides add coriander leaves and remove from heat.
Serve hot with plain rice first and then with sambar.
DSC07177

Thursday, July 21, 2011

Gongura Mutton or Mutton curry w/ Sorrel Leaves


DSC04587
We in Greater Toronto Area(GTA) are experiencing a heat wave, with temperatures poised to hit record highs we are under an extreme heat alert as dangerous heat invades ON & QC...kind of living Andhra summer here... So here is another signature dish of Andhra Pradesh, that we Telugu people celebrate.
DSC04602
A week ago I had this chance to make a much longed and missed leafy item dish called Gongura in Telugu(Andhra) which refers to Sorrel leaves in English. Give me this dish all through the year and I wouldn't say no to it. Then you can imagine how much I missed it over these years in Canada. We in east coast are not so fortunate enough to find Sorrel leaves in any grocery store, except someone gets the imported seeds and grow the leaves in summer in their farm or back yard. I think in west coast these are readily available thru farmers market..
A few weeks back a dear friend of us gifted me with this gongura which she purchased whole sale from an import vendor. My joy knew no bounds.
Though I have eaten and cooked Gongura in many varieties like Gongura dhal, Gongura Pachadi, Gongura tadka, Gongura Prawns..etc..the most relished combo for me with Gongura is Gongura Mutton.
DSC04594
Both my grand mothers and mother use to frequent this dish especially for me so passionately. Its like they use to dedicate this dish on my name.
So with that profound history lets see the making of it.
Good that I typed out the recipe long ago when my SIL asked for it, not withstanding the pestering my Bro gave her to make Gongura Mutton like my granny. Little did I believe that I will cook this dish my own in this part of the world.
DSC04614
Ingredients :
To Cook Gongura leaves:
1 bunch Gongura (Sorrel leaves)
4-5 Green chillies slit
1/2 of Small onion sliced
2 Big Garlic cloves, sliced
1/2 tsp home made Chilly made( andhra karam) - ( Use regular one if not available)
1 tsp oil
Rock salt to taste
Enough water to boil and cook the leaves thoroughly.
For the Mutton Curry:
1 to 1.5 lbs Goat or Lamb meat with bones cut into medium to small pieces
1 Tbsp Oil
2 Big or 4 Medium sized Onions chopped
4 Green chillies slit
6-8 Curry leaves if desired
2 Tbsp Ginger Garlic paste
1 Medium Tomato squeezed
1/2 Tsp Tumeric pwdr
1 Tsp Chilly power
1 Tsp Coriander pwdr
1 Tsp Home Made Garam Masala Pwdr
Salt to taste
DSC04599
Procedure:
Separate leaves from gongura stems ..do remember to add the small pods..which adds to the sourness.
Cook the sorrel leaves with all the rest of the ingredients in the "Cooking Gongura" list..till the leaves are fully cooked.
Remove from heat.
Mash the gongura thoroughly into a smooth paste and keep aside.
DSC04578
Now cook mutton the regular way...
Heat oil and saute' onions, green chillies, curry leaves.
Now add ginger garlic paste fry,
Add Squeezed Tomato and saute'
Add mutton, (usually 1/2 kg- for 1 bunch of sorrel leaves),
Add salt, karam, garam masala powder
Mix and fry for sometime..
Add a little water to cook mutton, or you can pressure cook it too.
Once the mutton is cooked almost, add the cooked mashed cooked gongura and mix well
DSC04585
Allow the gravy to cook for 7 - 10 so that the mutton absorbs the gongura .. and vice versa.
Once the gravy is thick remove from heat.
Serve with Hot rice.
DSC04615

Thursday, June 9, 2011

Curried Salmon Fish Masala- Jara Hatke!!

DSC00391
Was on a vegan spree for the last few months and yes still have a couple of vegan recipes in drafts to post...but I think my blog needs a non-vegan recipe feeds..Most of all June being my hubby's b'day month it would be appropriate to go with his favorite "seafood" theme. And guess what this is - his own creation too, with which he surprised me one evening when I returned Home late from work.
DSC00435
So all for you seafood lovers this is a must try...Salmon fish just blends with all the flavours of this recipe. You can't ask for more.
DSC00395
Ingredients :
4 large Salmon, fillets or steaks(Frozen or fresh)
2 Tbsp Oil
2 Medium Onions
2 Tsp Ginger Garlic Paste
4-5 Green Chillies Slit
A hand full of Curry leaves
Half a Tsp Turmeric powder/Haldi
1 Tsp Chilly Powder
Half a tsp Garam Masala powder
A tinge of black pepper
Salt to taste.
DSC00409
Procedure:
Oops!!! let me check it with my husband first..
Okay..got it..
Heat oil in a wok, add onions, slit green chillies and curry leaves and cook till onions are caramelized.
Add Ginger garlic paste and fry till raw smell is gone.
Now add turmeric powder, fry.
Add chilly powder and salt and fry well.
Now add the fish pieces and to watch them scramble as we mix and fry it with the onion masala.
Keep roasting for about 10-12 mins mixing regularly till the fish is done.
When the fish is almost cooked, add garam masala powder and sprinkle black pepper powder just before taking the wok off from the oven top.
Add coriander chopped if desired..
Serve with hot rice and sambar or mixed fried rice.

DSC00431

Sunday, May 8, 2011

Karela Khatta Meetha / Bitter gourd Sour & Sweet

---AKA Kakarakaya belam pulla Kura/ Pavakka Vellam Puli Kuttu---
DSC02841 - Copy
It's been a wet spring so far. But thanks for the change that is about to stay. Environment Canada is predicting above average summer temperatures from coast to coast and an increase of a couple degrees here in Toronto. We mothers are fortunate to have been bestowed with a warmer and dry Mother's day weekend. Happy Mothers days to all mothers!!!!
DSC02816
Thinking of mothers sure puts food they cooked for us on the top of the list. We can't be grateful enough for all the delicacies they showered on us. Mother's cooking is in itself a comfort and name one comfort food for me, is this sweet and sour bitter gourd curry. Yes, off course Bitter gourd is one of my fav veggies. For those whom this vegetable is an introduction or who shy away from this veggie, I encourage them to give this recipe a try, you won't be disappointed.

DSC02848 - Copy
Ingredients:
3-4 Medium Size Bitter Gourd (5-6 if small)
Oil - 1 tbsp
1/2 tsp Mustard
1 small Onion
3-4 Green Chillies slit
6-8 Curry leaves
Chilly powder - 1 tsp
Coriander powder - 1 tsp
1 small lemon Size tamarind ball soaked in enough water
1 Tbsp crushed jaggery
Salt - to taste
Coriander leaves - a small bunch
DSC02825
Procedure:
Scrape, Wash and slit Bitter Gourd into four parts and then further cut those four sides into small pieces.
Now soak the pieces in salt water to remove excess bitterness.
Food Pics5
Allow mustard to splutter in a kadai/pot after the added oil is hot.
Then add cut onions, green chillies, curry leaves and saute till onions turn slightly brown.
Add Tomato paste and fry for a minute or till raw smell is gone.
Add chilly and coriander powder and mix
Add Bitter Gourd pieces, salt, and mix well.
Sprinkle some water and cover with lid to cook the Bitter Gourd in steam for about 20minutes.
Keep mixing periodically and add more water if required.
Once the Bitter Gourd is almost cooked add the squeeze the tamarind juice into it and mix well.
Add jaggery and mix till dissolved.
Cook for another 5-7 minutes or till karela is soft.
Add finely chopped coriander leaves and remove from heat.
Serve this with hot rice and papaddam or dry fish or meat fry.DSC02816 - Copy

Thursday, January 27, 2011

Tangy Garlic Chicken Wings with Lemon, Onion and Coriander Infusion

DSC07517
Seems like the New Year has just began, but in just a few more days we'll already be heading to the second month of this year.. I couldn't take any time, to do posting for the last two weeks. It is still a crazy schedule. How nice it would be to have one good "Robo" for each family to help us with our work & daily chores. LOL!!! Well definitely we are in the era of Robotics, Rocket Speed age. So this is not far.

There is small mis-happening in publishing this post. It happened one day that I typed the whole draft, intro & recipe and with a single click, everything vanished. Since that day I couldn't get this done and put it up on my space.

Well better late than never, here I'm now. I'm not much a fan of Chicken wings, in spite of all the hype about it...I had never included it in my menu..Much more when my "SBD", is strictly wing-free. But this time I couldn't resist but to befriend them when I found these on sale and made this unique wings casserole.

I envisaged the flavour of lemon garlicky wings, so put together the wings with pepper, garlic, infusing fresh lemon, coriander leaves, onion into it and it turned out delicious. The juices from the chicken, lemon and onion, keep the wings moist.The best way to relish this is directly from the casserole, dipping the wings with the tangy juicy gravy!!! yummy!!!!
DSC07512

Ingredients :
10 Whole Chicken wings
1 tsp Olive oil

To Marinate:
1 small Garlic pod crushed fine
2 Tsp Lemon Pepper powder(use the regular black pepper alternatively)
1 tsp fennel seed powder
1/2 tsp Cinnamon powder
1/2 tsp Cardamom powder (Optional)
(1 tsp Garam masala powder can be used instead of the above three powders too).
A pinch of Tumeric powder
1/2 cup Yogurt
1 Tsp olive oil
Chopped coriander
Salt to taste fresh

To Infuse :
1 Big Lemon, cut into circles
1 Big Yellow Onion sliced
1 Small bunch of Coriander leaves

Method:
In a large bowl combine chicken wings with all the ingredients mentioned in the "To Marinate"
DSC07468
Marinate for 2 to 3 hours in the refrigerator.

Preheat oven for 350F.

Moisten a large glass casserole with 1 tsp olive oil.

Place the marinated chicken wings in the casserole.

Now arrange the lemon circles and sliced onions in the gap between the wings.

Top with a layer the coriander leaves.
DSC07485

Broil the wings for 40 mins at 350F.

Roast for 10 mins at 400F chicken till reddish golden brown.
DSC07491
Insert a knife into one of wings to check whether done.

Remove from oven and serve warm along with the juices from the lemon and onion in the casserole.
DSC07554

Wednesday, November 3, 2010

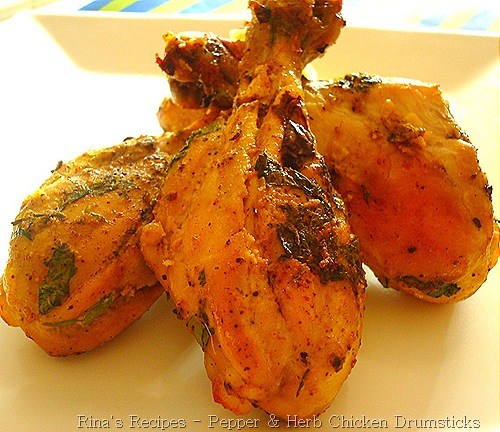
Pepper & Herb Chicken Drum Sticks

DSC05990
Can't believe we are already in the 11th month of 2010. Looks like we just started a new year and now in a couple months, its gone. Out of many projects for me this year, a serious blog make-over is long due. In the past 3-4 years though I changed the style & banners a couple of times..a sophi look and an own domain is most aspired..All the more when I'm will be submitting my posts to be published in a Toronto Desi portal. Don't know whether it is possible this year, as other priorities hit the list..Well, may be in the new year...better late than never..Infact I'm holding back many good posts for the same reason that I want to publish them with on a new look.

Coming to good food part for kids after all that loads of sugar, from goodies from Halloween, I have this kid friendly chicken drum sticks. By all means this is so flavourful that adults can enjoy too. But definitely falls into that category where spice and flavour here favour kids too. Totally my own creation, especially for my picky 1st grader and honestly worth trying as I received laurels from my girl friends too.

Ingredients :
7-8 Chicken drumsticks skin removed
1/4 cup Yogurt
1 Tbsp Ginger Garlic paste
1 Tsp olive oil
Salt to taste

Spices :
1 Tbsp Black Pepper Powder
1 tsp Garam masala (home made)

Herbs :
1/2 cup each of Coriander and Mint leaves chopped

Procedure :
In a large bowl combine cleaned chicken with all the ingredients mentioned in all sections.
DSC05976
Marinate for at least 30 mins

Preheat oven for 350F.

Line a Baking/Roasting try with aluminium foil and grease it with olive oil.

Arrange on the chicken drum sticks on the tray.
DSC05977
Roast the drum sticks for 20m and turn over and roast again for 10m

Now Increase heat to 400F and roast for 2-4m or till chicken is golden brown.

Remove from oven and serve with baked potatoes or veggies.

DSC05979

Saturday, October 16, 2010

Mutton Biryani - Spicy South Indian Style

DSC06016
This week being dedicated to husband appreciation...on the gastronomy part a little pampering him with a George Foreman Grill and also trying to make some of his favs..and the first thing he always want is Biryani..All the more when he was sick with flu and it was Thanksgiving week too.

Below is one easiest method to get this traditional dish on the dinner table for family and friends. Since the meat used is mutton, using a pressure cooker definitely speeds the cooking process. Again this is one of many ways that Biryani is made. The ingredients and the procedure differ to some extent in each type.

DSC06011
Ingredients:
2 lb Mutton (Leg with bones cut into medium size pieces)
3 cups Basmati Rice (Washed and soaked for 30 mins)
3 Tbsp oil/ghee
5 Bay leaves
5 medium or 3 big Onions cut length wise thinly
6-8 Green Chillies
4 Tbsp Ginger Garlic paste
3 Medium size Tomatoes quartered
1/2 tsp Turmeric powder
2 Tsp Red Chilly powder
2 Tsp Coriander Powder
2 Tsp Garam Masala powder(home made)
1/2 cup Curd/Yogurt
Water 3-4 cups
A bunch of Mint and Coriander leaves
Salt to taste

Procedure :
Add a little red chilly powder, salt and turmeric to the mutton pieces with a few drops of oil, mix thoroughly and keep aside.
Wash and soak basmati rice.
In a pressure cooker heat some oil/ghee, add bay leaf, sliced onions and green chillies.
Fry until onions turn golden brown.
Add ginger garlic paste and fry till the rawness is gone.
Add half of the mint and coriander leaves and fry.
Now add meat and fry well.
Add Chilly powder, Coriander powder, salt and fry again.
Add garam masala and fry till the pieces absorb the flavour.
Add tomatoes and cook till soft.
Add yogurt and cook till oil separates.
Add 1/4 cup of water mix and pressure cook for 20-25 mins
After that time, release pressure, remove lid and check to see if the meat is cooked.
DSC05997
Now add rice and fry again.
DSC06000
Now add enough water depending on the amount of gravy present, approximately 3-4 cups.
Add more salt and mix.
DSC06001
Pressure cook again for 7-10 minutes.
By then all the water is evaporated and the rice is cooked.
Release pressure, uncover, and then add the remaining herbs.
DSC06004
Transfer the biryani to a serving dish.

DSC06009
Serve hot with raita or egg plant masala.