Saturday, January 4, 2014

Chicken Lollipop

IMG_1992

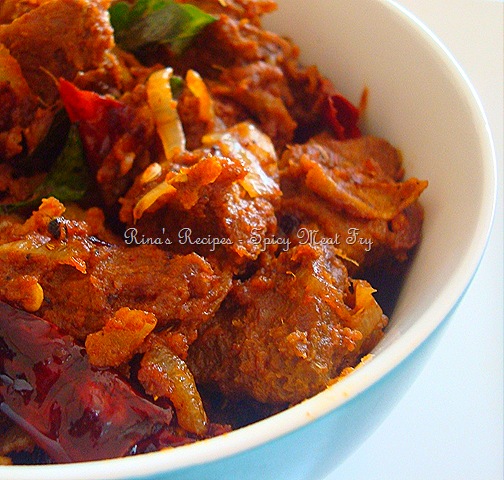
This winter, I tasted this appetizer a couple of times and wanted to try to make it myself at home. Though time consuming, the taste is worth all your hard work and above all kids luv these lollipops to peices. Thanks to a dear friend who inspired me to write this recipe and publish.

IMG_1987


Ingredients :

2 chicken wings made into lollipops

1st Marinade:
1 tblsp soy sauce
1 tsp Asian red chilly garlic sauce

2nd Marinade:
1 tblsp ginger garlic paste
1 tblsp Chicken 65 Masala or any fried chicken masala

Optional : ¼ tsp Chicken Tikka Masala ¼ tsp Chicken Tandoori Masala

3rd Marinade :
1-2 Eggs beaten
1/2 tsp Red Chilly powder
A pinch of Black & White pepper powders
A pinch of Home made Garam Masala powder
¼ cup corn flour or corn starch or Channa flour
Salt to taste Red food color -- if desired.

Oil for deep frying

Method :

To make lollipops:
Usually a chicken wing consists of 3 parts. First cut and discard the end part which is the smallest.
Now with the remaining wing, cut each wing in half, along the movable bone joint.
Of the two parts left, one part will have two parallel bones, and the other part will have a single bone.
You will get two lollipops from each chicken wing.
Now, for the part where only one bone is there, cut the ligaments near one end of the bone so that the muscle separates from the bone.
Roll this muscle over to the other end, without cutting the ligaments at that end.
The muscle will thus remain hanging, and can be rolled over to form a lollipop.
Coming to the part which has two parallel bones, do the same but also, but remove the extra bone (smaller bone)

I usually do my marination in three stages.

First stage I add soy sauce and red chilly garlic paste and leave it for 5-15 minutes.
IMG_1976

Second stage I add all the ingredients in the second marinade and set aside for another 15 minutes.
IMG_1979
Finally I beat an egg, add chilly power, salt, pepper powders, garam masala and any coloring and beat the mixture.
Then add the channa flour or corn flour and beat thoroughly to make a smooth batter without lumps.
Then I add this mixture to the lollipops and coat them evenly, taking care that there shape is not lost.
IMG_1980
You can avoid this step and may just want to dip the marinated lollipops into the Egg mixture and fry them.
IMG_1982
Heat oil in a deep vessel.
Add the lollipops one by one and fry them in batches till nice red in color and till crisp look.
Once done, you can wrap the ends of the lollipops with foil from presentation.
IMG_1986

Sunday, February 5, 2012

Tomato Dhal

DSC03241 DSC03192 Dhal cooked with tomatoes and gently tempered with fried onions, dried red chillies, curry leaves and other exoitic spices is a comfort food in itself. Served with hot rice and a few drops of ghee, is one soothing therapy for soul. This recipe comes start from Granny's kitchen. DSC03222
Ingredients:
To Pressure Cook:
2 Large Ripe Tomatoes(Sour Varitey), cut into 6-8 peices each.
1-1/2 cups Toor Dal
3-4 cups Water
4 pods Garlic
4 Green Chillies slit
1/2 Tsp Turmeric Powder
1 tsp gingely oil Salt to taste

DSC03212 For Tempering/Talimpu/Tadka :
1 Tbsp Ghee or Gingely(sesame) Oil
1/2 tsp Mustard Seeds
4 Red Chillies broken
1 Small Onion cut length wise
4 Small garlic Pods with skin(Slightly beaten)
A few Curry leaves A hint of Hing/Asafoetida DSC03207


Method:
Wash dal and add cut Tomatoes to it.
Pressure cook dal and tomatoes with all the other ingredients in the "To Pressure Cook Section". Mash dal adding required salt once cooked.
In a kadai heat oil and add all the tempering ingredients after the mustard splutters.
Fry a little and then add the cooked dal and mix it thoroughly.
Garnish with Coriander if desired.
Serve hot with Rice or Rotis.
Goes well with any accompanying vegetable roast or chicken, meat or fish roast.
Even more exciting combination is Tomato Dhal with Dry fish roasted with onions. DSC03214

Tuesday, January 31, 2012

Spicy Meat Roast


3

Did you miss me?? I guess yes!!! Well, though I couldn't post last 2-3 months, I'm glad to be back again..Food blogging is a passion for life time you know. If not the first day of the year, Here I'm the last day of the first month. My my see, how January has gone I like a breeze.. 6
So let my first post of this year start with some real spice. Here's to all meat and spice lovers..presenting a spicy meat roast.
Choice of your meat, preferably red meat and go for rib eye of eye of round cut. Meat is cut into small cubes and pressure cook with various masalas and then comes the intresting part of tempering it with dry spices with elevates the level of taste to an extreme satisfaction7
Ingredients :
1 lb meat
2 + 1 Tbsp of Ginger Garlic paste
3-4 Green Chillies Slit
1 + 1 Tbsps of Olive or Sesame oil
1/2 tsp Turmeric
1/2 tsp Red Chilly powder
1 Coriander powder
3/4 + 3/4 Tbsp of Garam Masala powder
1 tsp Fennel seeds
5-6 Red Chillies dry
10 or handful of Curry leaves
1 big Onion sliced

Method:
Place meat in the pressure cooker and to it add 1 tbsp each of ginger-garlic paste, oil.
Add ginger chillies, turmeric, chilly, coriander and 3/4 spoon of garam masala powders.
Add 1 cup of water and pressure cook for 25 minutes or more depending upon the choice of meat. Once the meat is cooked empty it in an vessel and keep aside.
Heat oil in a wok or kadai.
Roast fennel seeds till aromatic.
Add red chillies fry for 5 seconds till color slightly changes.
Add Curry leaves and fry till crisp.
Add onions and roast half cooked.
Add remaining ginger-garlic paste and fry.
Now add the cooked meat with gravy and keep stirring thoroughly till all the waters evapourates. Sprinkle remaining garam masala powder mix well till you can smell the aroma of the spices. Remove from heat and transfer into a serving bowl. Serve hot with Rice and Dhal curry or sambar.
If you are on low carb diet, skip teh rice and have it as side with any stir-fried or baked veggies.
I bet you will say "Yummy!!!"

8

Tuesday, September 20, 2011

Mixed Fried Rice

DSC00427
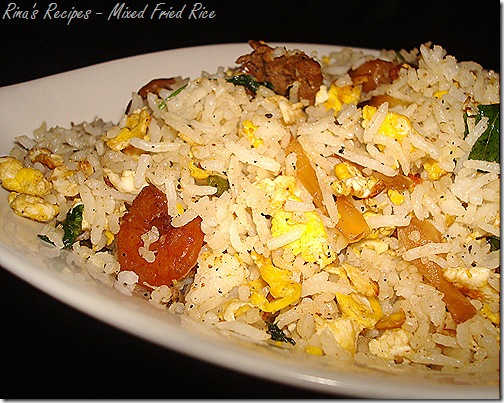
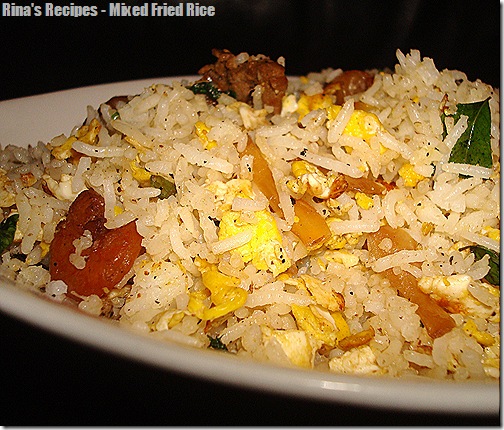
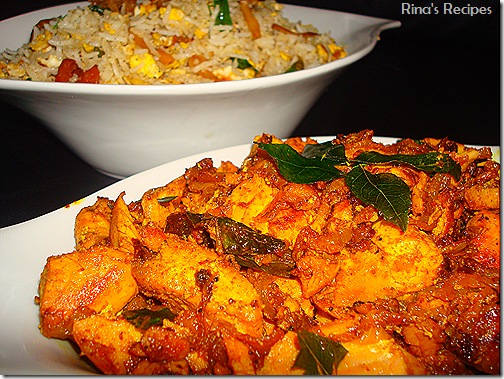
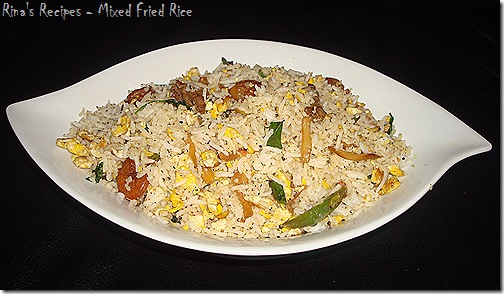
This dish needs no introduction..A staple in all Indo-Chinese restraurants and a must with any oriental side dish, like chilli chicken, manchurian, ginger chicken, sweet and sour varieties.
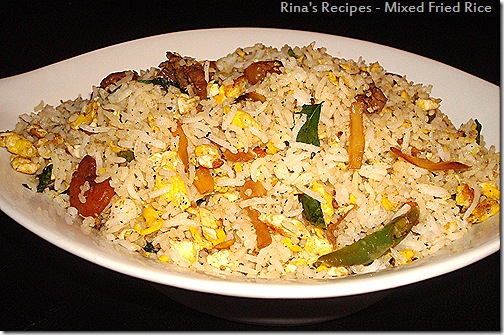
DSC00415
Again fried rice is so versatile dish. Sure they are hundreds or thousands of varieties of this type of preparation and this is only one of them.
DSC00417
Ingredients:
4 - 6 Cups Cooked Rice(Preferably Basmati)
2 tsp Sesame oil
5 Thai or regular Green Chillies slit and cut diagonally
1 big Onion cut length wise
2 Tbsp fresh ginger garlic paste or use freshly chopped
1 Egg (beaten and scrambled)
2 Cups choice of veggies diagonally crated (Carrots, Cabbage, Green Beans,)
Choice of meat, poultry, seafood(Small peices Chicken, beef, mutton/lamb and small variety shrimp/prawns)
2 Tbsp Soya Sauce
1 Tsp fish Sauce
1 Tsp Green Chilly Sauce
1/2 Red Chilly Garlic Sauce(completely optional..I didn't use)
1/2 White Vinegar
A few sprinkles of Cooking Wine
A pinch of Aginomoto(optional)
Salt to taste
Spring onions chopped, one half to add while frying and the other for garnishing.
DSC00420

Procedure:
In a wok, heat oil, sizzle green chillies.
Add Onions and cook till crispy
Add ginger garlic paste and saute'
Add half of spring onions and saute'
Add Chicken, meat and seafood and salt and dependign fresh you are using fresh or cooked give time to cook or warm up.
Add half of the sauces at this point.
Now add the Chopped veggies, some salt and stir the veggies till crispy and cooked, for 5 -7 mins or so,
Add aginomoto if using.
Now add the cooked plain rice along with all the remaining sauces.
and combine well to coat all the grains evenly with the mixture.
Add scrambled egg.
Add enough salt again and mix well.
Transfer to a serving bowl and Garnish with spring onions.
Serve with choice of any Indo-Chinese Side dish.
DSC00432

Saturday, September 17, 2011

Curried Minced Meat w/ Ridge Gourd

------AKA Kheema Birakaya/Birakankai Kheema-------
DSC07176
Kids back to school last week after that long summer break and though fall is going to officially start next week, it seems like winter is already here..And chill weather always calls for something soothing and comforting..and think about comfort food its always authentic dishes from home afar..One such comfort food for me is a cup of hot rice with this preparation of minced meat and veggie..

The combo of a non-veg and veg is always a hit and it got to be when it is an Andhra preparation. So here is yet another scrumptious dish straight from amma's kitchen. Being a Tamilian, my husband is not so used to these combos. Though he loves Andhra cuisine and by all means my cooking, the first time I mentioned I'm preparing Kheema(Minced meat) with Ridge gourd(Birkankai - Tamil) he had his eyebrows raised but totally got bowled with the result..
DSC07184

So for those who enjoy Indian cooking and don't mind eating meat, next time pickup a pkg of minced meat and a pack of Ridge gourd(readily available in most of the South Asian stores) when you grocer and let your kitchen be filled with the aroma of this side dish.

Ingredients:
2 to 3 long - Beerakaya/ Ridge Gourd / Beerkankai (De-skinned and chopped into small cubes)
1 to 1.5 lb Kheema ( Mutton/Beef)
2 tsp oil
2 medium Onions chopped
4-5 Green Chillies slit
A Few Curry leaves
1 Tbsp Ginger garlic paste
1/2 tsp Turmeric
1/2 tsp Red chilly powder
1 tsp Coriander pwdr
1/2 Cumin pwdr
1 tsp garam masala powder(Home Made)
Salt to taste
Finely chopped fresh coriander leaves to garnish
DSC07179
Procedure :
Heat oil in a pan/wok and add chopped onions, slit green chillies, curry leaves, and cook till onions are translucent.
Add ginger garlic paste and cook till rawness is gone.
Now add minced meat(kheema) and salt.
Add garam masala powder
Mix well.
Cover and simmer for 8-10 minutes or till the kheema changes color, stirring occasionally.
Add chopped ridge gourd pieces to the kheema curry and cook till both are is fully done.
to upload7
Sprinkle some water if too dry while the kheema is cooking.
Cook till the ridge gourd almost gets disappear in the kheema..much like the pic above..follow the pics anti clockwise..
Once the kheema is cooked and oil starts oozing from the sides add coriander leaves and remove from heat.
Serve hot with plain rice first and then with sambar.
DSC07177

Friday, September 2, 2011

Ivy Gourd in Green Chutney / Tindora Hara Chutney wala

Dondakaya Kothimiri Karam Vepudu / Kovakai Kothimalli Kara Poriyal
DSC03074 - Copy (2)
Cooking is all about experimenting with the ingredients you have ready at hand..I'm always open for cooking without a recipe or adding variations to the staple procedures. No wonder I'm a fan of Michael Smith from Food Network/Food TV and always admired his style in the program "Chef at Home", where he always emphasis on cooking without a recipe.
DSC03064
Today's recipe is one such which absolutely came from my heart when I envisaged the flavours of adding the green chutney to regular Tindora stir fry and whipped up the same.

DSC03042

DSC03060
Ingredients:
1 lb Ivy Gourd/Dondakaya/Kovakai/Tindora (Cut into thin discs or cut length wise
1 tbsp oil
1/4 tsp Mustard seeds
1 Onion small chopped
2 Red Chillies broken into small pieces
1/2 tsp Red chilly powder
1/8 tsp Turmeric
A few curry leaves
Few lemon drops
Salt to taste
DSC03072
for the Green Chutney:
A Small bunch of Coriander leaves, chopped
1 Garlic clove chopped
4 Green Chillies chopped
Add water to the above items and grind to a chutney. Keep Aside
DSC03074 - Copy
Method:
Heat oil in a kadai or wok.
Allow mustard seeds to splutter.
Then add the red chillies, onions, curry leaves one after the other and fry till onions are translucent.
Add the turmeric powder.
Food Pics6
Now Tindora and required salt, give it a nice mix to coat them well with the seasoning.
Sprinkle some water and cook covered with lid till the Tindora is 3/4 cooked.
Keep mixing in regular intervals.
Now add green chutney and mix thoroughly..
Let the Tindora absorb all the green chutney into it.
Keep stirring till all the water is evaporated and Tindora is dry but well coated with the green chutney masala.
Add a hint of lime and remove from heat.
Serve hot with Rice, Sambar or Dhal curry
DSC03081

Thursday, August 25, 2011

Cabbage Fritters or Pakoras

AKA Cabbage Pakodi /Pakoda
DSC03103
Got introduced to these fritters during my MCA days when our neighbour made these and passed it to us. I was actually stunned to see the ingredient inside these pakoras was cabbage..Because those days we are only used to onion pakoras..Wanted to include this snack in my kitchen menu too..Since it is deep fried I haven't made it once or twice say in these 12-13years..
The other day specially made these to blog on my space..Honestly is this one unhinged snack - guilty of course..You are consuming the nature's most nutritious vegetable in not so healthy form..but once in a while you got to have a treat!!! so enjoy sparingly with portion control!!!

DSC03101

Ingredients:Cabbage - 2 Cups
Channa Dhal Pwdr- 1 Cup
Green Chillies - 2 (chopped)
Baking Soda - A pinch
Red chilly powder - 1/2 tsp
Turmeric Pwdr - A pinch
Chat masala Pdwr - 1/2 tsp ( for extra flavour)
A pinch of Amchur pwdr
Curry leaves - 8-10
Coriander leaves chopped - a few
Salt - to Taste
Enough Water

Oil for deep frying
DSC03106

Procedure:
1. Chop cabbage as shown in the pic and place it in a mixing bowl
2. Add the rest of the ingredients with water to make the batter thick enough to gather everything together. Adding excess water will make the Pakoras very oily. Food Pics7
3. Now drop small amounts of the mixed batter into the oil for deep frying.
Once the pakoras turn dark yellow or orange color strain them from oil onto a plate with issue paper to drain all the excess oil.
Arrange the Pakoras on a serving plate and enjoy with array of chutneys or sauces
DSC03100